Tuesday, June 11, 2013

BONELUST Q&A: "How do I put mandibles back together & teeth in?"

BONELUST Q&A: "How do I put mandibles back together?" There are many ways to reattach two mandible halves that have come apart. Depends on the species. I prefer to use regular white school glue because you don't always get it right first time around. It i

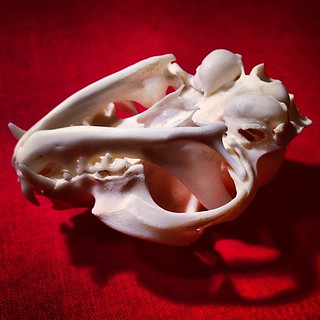
There are many ways to reattach two mandible halves that have come apart. Depends on the species. I prefer to use regular white school glue because you don't always get it right first time around. I also use this same glue to put teeth back in. It is water soluble so you just soak it in water, wash off the glue, let it dry & re-glue. Also, not all mandibles can simply be put back together. Some are lacking muscle where they once connected and do not perfectly fit together anymore once the flesh is gone. That's why sometimes you see people using rubber bands to hold the two jawbone halves together on deer, goats and similar species. For a small mandible like this cat skull I just put a small dab of glue where they connect then rest the two halves balanced together with the skull flipped over. Always be sure the mandible fits the skull properly before it dries. This flip over and balance trick doesn't work for everything obviously. Sometimes you just have to carefully tape the end after applying the glue. And sometimes some mandible shapes let you clip them together while they dry with a clothespin. You just have to figure out what works best for you. It is also important that all incisors are already sealed into place before you attach the mandible halves. Otherwise glue may fill the holes where their roots go.

Here's a related blog post - BONELUST Q&A: "The teeth fell out of my skull! Did I do something wrong? How do I fix it?"


Monday, June 10, 2013

BONELUST Q&A: "How will I know if a skull or bone needs degreasing, I'm not sure what it even looks like?"

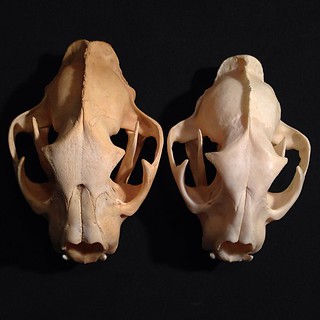
BONELUST Q&A: "How will I know if a skull needs degreasing, I'm not sure what it even looks like?" These are my two Mountain Lion skulls. The natural body oils are very apparent on the specimen on the left. The golden coloration is a dead give away that i

Here are two Mountain Lion skulls. The natural oils are very apparent on the back of the specimen on the left. That golden pooling grease coloration is a dead give away that it was never properly processed. But the front is also dry and suggests sadly that this antique skull was once boiled. The skull on the right is still lightly greasy to the eye and touch but not so bad that I feel the need to urgently degrease. It will naturally rise to the surface creating areas where it pools making it easier for me to remove it at that time. I regularly do degreasing and whitening touchups to my collection as needed like this. With larger skulls I especially prefer to do it this way rather than possibly degrade the quality of bone trying to force grease deep in it out over a very long period of time. With experience you will be able to tell by smell, touch, color and weight if you need to degrease.

COLOR - Yellow/brown toned colored bone does NOT always mean it is grease! Some factors to keep in mind: yellow can also mean that it was once boiled, chlorine bleach was used in the processing, could be soil staining, maceration staining, from a home that had a lot of cigarette smoking, humidity and other factors.

COLLECTION - Degreasing is a step in bone processing that is partly a matter of personal preference to the bone collector. But leaving large areas of grease in not advisable. It will become tacky to the touch attracting dust and smell badly - both of which will attract carrion insects to your home/collection like carpet beetles and pantry moths. And possibly start to degrade the bone itself. The way I process bones outlined in my posts here I rarely need to degrease much because it gets mostly taken care of during bonecage decompostion/defleshing and maceration and hydrogen peroxide followup

ART USE - As an artist, you really must do degreasing if you see any on bone. Especially if you plan on painting or adhering anything to. As more rises to the surface both the paint and glue will fall off. Even if you use a primer. That will also be penetrated and destroyed with grease in time. And selling grease saturated bone jewelry is just unsanitary.

PET MEMORIALS -  If you are doing pet aftercare involving any skeletal work degreasing is an absolute must. Especially if you are doing articulation that involves glues that grease will later degrade. 

For long term preservation, too much natural oil in bone is bad. But at the same time, 100% grease free makes bone more fragile because grease is a part its natural components and sometimes bones can even shrink a little. For me personally, I believe that a little grease left in bone is best for the longest preservation. I was told by a university professor that some museums stopped fully degreasing and whitening specimens devoted to research. Much older museums did little to no degreasing or whitening at all and those specimens have been there for hundreds of years. I just find this really interesting. 

More related extensive info here:

Whitening Bone Using Hydrogen Peroxide NOT Chlorine BleachBad Words: BOIL & BLEACH

The Mathematics Of Maceration - A HowTo Guide For The Impatient

Wednesday, June 5, 2013

Whitening Bone Using Hydrogen Peroxide NOT Chlorine Bleach

BONELUST BONE PROCESSING PROGRESS: Cat Skull finished (mandible still in maceration). Note, cat only had incisor roots remaining. Front view.

I recently edited my Bad Words: BOIL & BLEACH post here adding much more extensive info about using hydrogen peroxide (H2O2). Posting it as a new blog with even more info and photos so you guys don't miss this important info.
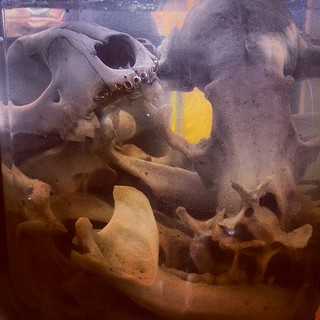
BONELUST BONE PROCESSING PROGRESS: View Of Raccoon Skulls & Bones Recently Posted Here In Peroxide Bath. They Are Cleaning Up Nicely.
In the H2O2 bath.

ON THE DRYING RACK: Always Seem To Have Every Step Of Bone Processing Going On Here At All Times - Learn More At My Blog Bone-Lust.Blogspot.Com
Drying after the H2O2 bath.

NEVER use chlorine bleach on bones.

Chlorine based bleach permanently damages the bone itself. It will start to break down the structure of the bone and will continue to even after it is rinsed and dried. Resulting in chalky, fragile and extremely porous bone that will turn to bone meal with age. Not to mention it turns the bone yellow. Which pretty much defeats the purpose if you are trying to whiten the bone. It may appear white at first but will turn yellow. Once it yellows from bleach there is nothing you can do about it. Believe me, I've tried to salvage yellow bleached skulls before to no avail.

Bone Collectors Gold: I enjoy quickly 
changing the topic every time I buy a mass quality of Hydrogen Peroxide.
 Most people wouldn't appreciate the truth. Finding this much all at 
once isn't easy around here.

To sanitize and whiten bone use regular household hydrogen peroxide (H2O2) that you can easily and inexpensively get ahold of at the grocery store, dollar store or drugstore. Pure is fine but if you are really concerned about something small/fragile you can do a 50/50 bath with water. Pour it just above the bones in a loose lidded plastic container to reduce evaporation. Oxygen activates the peroxide so you want to let air get to it. But it will evaporate so keep an eye on it and top it off as needed. Also, if you have a tight lid on it pressure may build up and the top literally blows off.
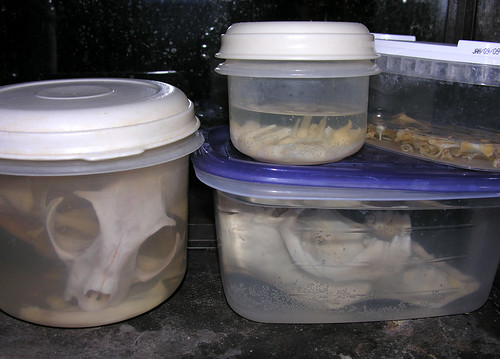
BONELUST - Skulls, Bones & Teeth 
in Hydrogen Peroxide Baths
Lids are loose to let oxygen in and pressure out.

How long? Just keep the bones in this bath until they are the color you want them. This is a personal preference. Note that the bone will dry lighter than it looks wet. This process can take days or weeks. Although if you leave it too long it will eventually make the bone brittle. But this usually would take months for medium sized bones like say of a raccoon. This is a very safe process for most bones if you properly follow my steps. When done whitening, rinse the bones in water then lay out to dry in the sun on towels or dry inside with a fan on. I put towels or paper towels under the bones to help pull moisture out. Be sure the bones are dry before you put them in a sealed container for storage or they may mold.

Just my usual day. Cleaning & 
sorting bones for Bone Lust projects.
Sun drying bones.

More About Mold

These were bright white cleaned bones. I thought I had left them out to dry long enough but apparently hadn't. I bagged them up in a ziploc and put them in my supply drawer. Only to find some time later that the had become splotched with black mold through the bone core and on the outside. I soaked them for weeks in full strength hydrogen peroxide but they only got this white again. In the closeup on top you can see the actual mold inside the bone. I think the molding also had to do with the bone needing to be degreased more. The mold spread to all bones in the batch though. Those not needing degreasing as well.
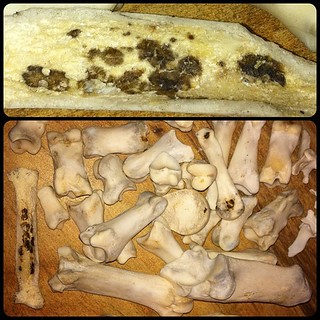
Problems With Bone Processing: Molded 
Bones

These bones had been cleaned and dried but got humid and grew a green fuzzy mold on them. Luckily I just hosed them off and gave them a H2O2 bath and they cleaned up beautifully. So this is a reminder to store bones in a dry place.
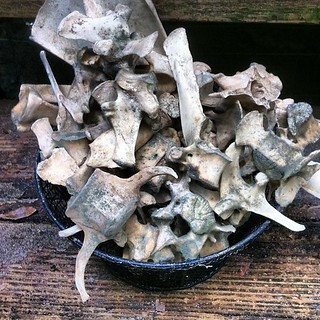
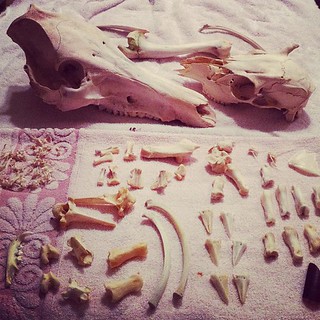
The Hazards Of Bone Processing In The Humid South: Moldy Bones - These Deer & Wild Boar Bones Were Already Cleaned & Stored On My Porch - All The Rain Lately Made Them Mold

Important factors: If your H2O2 bath gets really cloudy you likely need to dump it out and start a new bath. Otherwise it will start to macerate instead. Do not use a metal container with H2O2. Use plastic or glass. Store in a cool dark place. Direct sunlight will eventually deactivate H2O2 that's why it comes in dark containers. Do not do this step outside with no lid. You will just end up with deactivated H2O2, algae and insect larvae all over you bones and you'll have to start over... or the bones may be ruined.

Nearly Done: Peroxide Bathing Deer Skull 
& Jaws
Bubbles is a good sign your H2O2 is still active.

DO NOT use hair developer type peroxide on bones, ever.

There are additional ingredients in it besides H2O2 and it is MUCH stronger than regular corner store purchased H2O2. Which I think is only 3%. I have experimented with this myself and the developer turned huge deer vertebrae to literally mush in my hands. Likewise, do not use the powdered hair bleach packets. The same results will happen. So you've been warned!
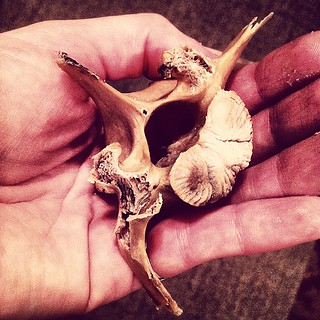
Bone Processing No-No: This Is Why You NEVER Boil Bones To Clean Them. This Normally Very Thick & Strong Boar Vertebrae Literally Turned To Mush After 2 Days In Very Low Heated Water. Imagine What Damage  A Full Boil Could Do In A Matter Of Hours. I Crush
Improperly processed vertebrae that turned to mush in my hands.

Algae & Moss Covered Nature Cleaned Bones

Note that some staining will not come out especially if bones were decaying on the forest floor for some time. Remember, you want to be sure the bones have already been degreased and cleaned of all flesh/dirt/etc before putting into the peroxide.
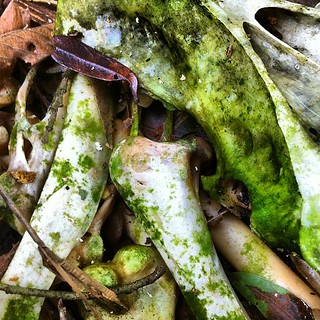
This Is What Happens To Bones Left Outside For Too Long: Might Leave Some Of These Wild Turkey Bones This Way For My Art

Too late to clean and whiten these bones. After bones have been left in the elements for some time they begin to break down. These bones are now "living" again covered with algae/fungi that is eating it. This is one reason I choose not to do the bury method. If you wait too long bones have already begun to decay. I like processing methods where I can see what is happening to the remains at all times.
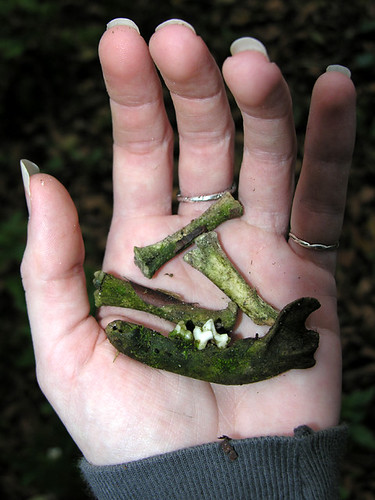
BONELUST - Old Bone Box Growth/Rot on Misc Animal Bones (Macro)

BONE PROCESSING BLOG POST WITH TIMELINE:

BONELUST BONE PROCESSING PROGRESS: First Adult Goat Skull processing progression photos & timeline.

See the post that goes along with the above photo here -  BONELUST BONE PROCESSING PROGRESS: First Adult Goat Skull processing progression photos & timeline.

For even more extensive info about all the steps I use in processing bones check out the rest of my blog. Enjoy!