Keep in mind first of all, there is no one way to process animal remains to get the bones. My blog posts here are just my opinion from my own personal experience. I've been collecting bones for 33 years now and I still learn new things all the time. Best way for you to learn is from your own experience.
There are two standard rules of what NOT to do:
1) NEVER BOIL BONES
I think the word 'boil' pops up a lot because of one bone defleshing process called the European skull boil method. Which is very poorly named. You want your water to simmer, not boil. Although I never use this method myself and avoid any kind of heated method.
Boiling causes fat to soak into the bone. Leaving you with a greasy, smelly and yellowish bone. Which can go rancid if left as-is as many do that use this particular process. Yes, grease can be removed with ammonia or dish soap soaks and patience. This is a slow process which can take weeks or even months. But when you actually use a heated defleshing process you're making a lot more work for yourself driving the grease deeper into the bone, not to mention degrading the bone quality.
Boiling can also weaken and break bone that has already started to decay from being highly weathered or buried. Turning smaller bones to mush, causing fragile bones like those in the nasal cavity to fall out and often cracking enamel off of teeth. So instead, slow simmer if you absolutely must. If you see bubbles, your water is too hot! Though, I personally no longer use any kind of heated processing method ever. I opt for maceration and patience leaving me with a higher quality bone.
In my experience the more unnatural processes you put the bones through the greater the chances you are lowering the quality of them.
2) NEVER USE CHLORINE BLEACH ON BONES
Chlorine based bleach permanently damages the bone itself. It will start to break down the structure of the bone and will continue to even after it is rinsed and dried. Resulting in chalky, fragile and extremely porous bone that will turn to bone meal with age. Not to mention it turns the bone yellow. Which pretty much defeats the purpose if you are trying to whiten the bone. Once it yellows from bleach there is nothing you can do about it. Believe me, I've tried to salvage yellow bleached skulls before with hydrogen peroxide to no avail.
Instead, to whiten bone use regular 3% household hydrogen peroxide (H2O2) that you can easily and inexpensively get ahold of at the grocery store, dollar store or drugstore. Pure is fine but if you are really concerned about something small/fragile you can do a 50/50 bath with water. Pour your H2O2 just above the bones in a loose lidded plastic container to reduce evaporation. For H2O2 use it is best to stick to plastic containers as it can have a negative chemical reaction to some metals! You want to avoid using glass jars with lids for any bone processing step as pressure will build up inside (maceration or H2O2). Oxygen activates the peroxide so you want to let air get to it. But it will evaporate so keep an eye on it and top it off as needed. Also, if you have a tight lid on it pressure may build up and the top literally blows off and you'll hear a "pop", ha!
How long? Be patient. Just keep the bones in this bath until they are a shade darker than you want them. They will dry lighter. This process can take days or weeks. This is a very safe process for most bones if you properly follow my steps. When done whitening lay the bones out to dry where pets, wildlife or children can't get to them. I have a ceiling fan on my front porch and that's my drying station as the sun gets to them as well. IMPORTANT: Be sure the bones are completely dry before you put them in a sealed container for storage or they may mold on the outside or even turn black inside. If you see mold immediately put them in H2O2.
Important factors: If your H2O2 bath gets really cloudy you likely need to dump it out and start a new bath. Otherwise it will start to macerate instead. Please DO NOT ever pour H2O2 out outside on the ground as it horribly will kill the creatures living in your soil! Do not use metal containers or tools with H2O2. Store in a cool dark place. Direct sunlight will eventually deactivate H2O2 that's why it comes in dark containers. Do not do this step outside with no lid. You will just end up with deactivated H2O2, algae and insect larvae all over you bones and you'll have to start over... or the bones may be ruined. Plus you'd be killing animals that may get into it and it is not safe for pets or wildlife to drink!
DO NOT use hair developer type peroxide on bones, ever. There are additional ingredients in it besides H2O2 and it is MUCH stronger than regular H2O2. Which is only 3%. I have experimented with this myself and the developer turned huge deer vertebrae to literally mush in my hands. Likewise, do not use the powdered hair bleach packets. The same results will happen. So you've been warned! I see a lot of people using/suggesting hair products like this. If your argument is that you're saving money, you can just get pure food grade 12% hydrogen peroxide and water it down like this here. I have used this one myself.
Degrease or Whiten? You can alternate back an forth between degreasing and whitening with H202 as much as needed. But you want to be sure the bones have already been defleshed and cleaned of all dirt/fur/etc before putting into the peroxide. With larger skulls, after maceration I often followup with whitening instead of degreasing. This way I can see the exact state of the grease better than if I had not to know how to more forward with degreasing. You often can't tell if you're seeing soil or maceration staining vs grease after maceration.
Additional notes: Some soil staining will not come out especially if bones were decaying on the forest floor for some time or buried. But you can keep trying, letting dry then repeating. Highly nature weathered bones found out in a field will likely stay a grey color. But trying to degrease/whiten them you could end up degrading or destroying them. So use caution doing so.
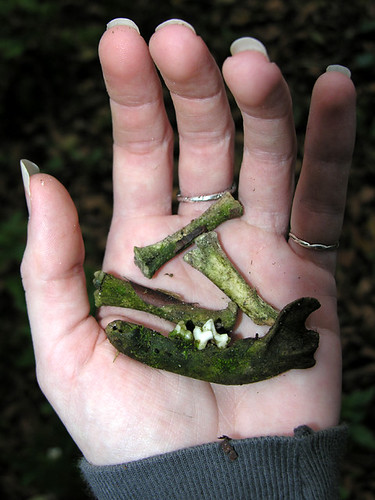
Too late to clean and whiten these bones. After bones have been left in the elements for some time they begin to break down. These bones are now "living" again covered with algae/fungi that is eating it and will be part of the soil soon. This is one reason I choose not to do the bury method. If you wait too long bones have already begun to decay. I like processing methods where I can see what is happening to the remains at all times.
To deflesh bones you have a number of options but I use two processes the most:
A) Nature Cleaning (some call it Range Cleaning like as in cows dying out in the pasture and left there to decay) - Put the animal remains in a cage and leave outside so that the insects, rain and sun can do their job.
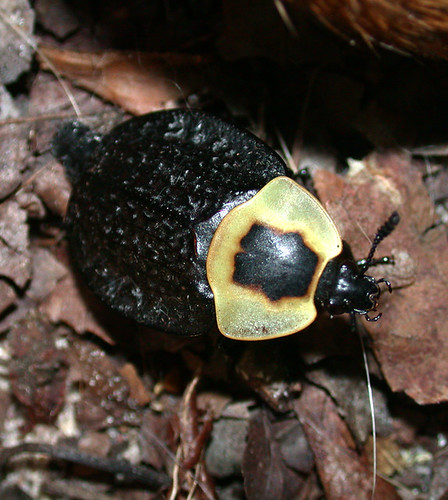
One of many carrion insects - the American Carrion Beetle, Necrophila americana.
You want it in a cage so that scavengers won't run off with limbs. You want to be sure to do this. Believe me, even insects have taken off with my bones in the past. Sometimes I also add a thin screen under the bottom of the bone cage to catch any really small bones that fall off. (Note that since I originally made this blog post I now have rows of much better bone cages that I will make a full post about at another time and link here but for now here's a shorter version. The one below has many flaws and in the end did not work well).
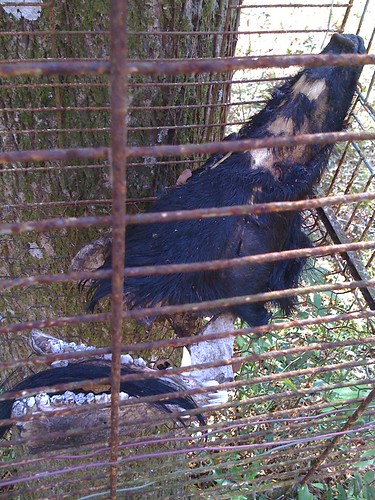
Wild boar head, jaw and tail in cage mounted to tree.
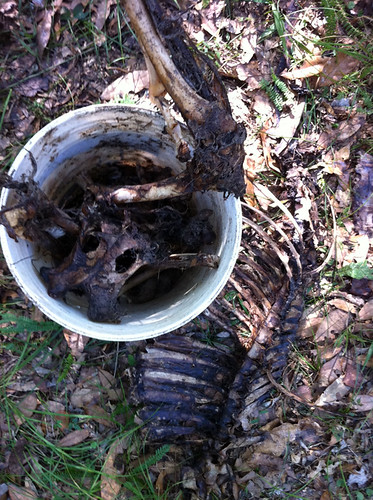
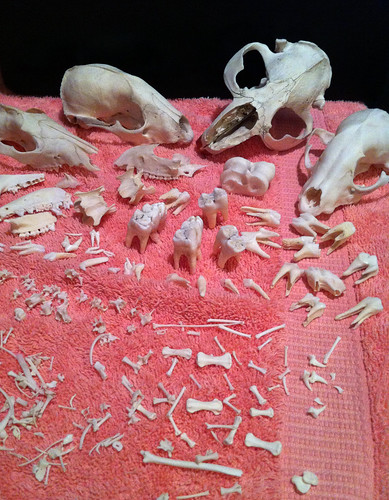
Nature cleaned deer remains, ready to macerate.
B) Maceration - Try to remove as much loose fur/flesh as you can by hand. Don't yank it it, that can break the bones! If it is mummified you may be able to cut off dried flesh parts with scissors. Then put the animal remains in plastic lidded container fully immersing it in water. This can be an inexpensive process reusing old containers - 5-gallon buckets, old cat litter plastic tubs, old plastic coffee contain are all great for this purpose. This is rotting process. Involving the living bacteria that break down the flesh on the bones. I try to put as minimal flesh in for this step as possible. When doing so I never even have to do a water change. I just leave it alone for 2-3 weeks and the bones are completely free of all flesh etc. But sometimes I do put a whole mummified animal in that is only left with bones and minimal skin/fur after vultures have stripped it of flesh, guts, eyes, etc.
When you do put in something that still has a lot of flesh say like a skinned and gutted animal that still has a lot of flesh, tongue, eyes, brain etc - you will need to do water swap outs every week or so and this will take longer that it needs to. Making more work for yourself in the end. I've absolutely found the bones being more greasy this way as well.
You NEVER want to put in a whole entire animal. You are creating a nightmare for yourself, truly. Creating so so much work for yourself and absolutely the top level worst spelling situation. The animal with bloat as it fills will gasses and float for starters.
But to be clear this is a VERY bad smelling process. If it smells like putrifying flesh, you're doing it right ha! As the flesh falls off the bones the water will become nasty/smelly. If you're a week in and actually seeing floating pieces of fat, fur, flesh etc - pour HALF of it out and replace with new clean water. You never want to pour all of it out because you want to keep your bacteria working friends but get rid of the stuff in there that's smothering them or slowing the process like a lot of fat. Repeat this process until all you are left with is bone.
IMPORTANT TEMP NOTE - Maceration greatly slows in colder weather because the bacteria die off or can't even get started. Likewise if you were to leave your maceration in full sun there's a good chance it will get too hot and you kill it, causing you to have to start over. It doesn't need to actually be hot to work, warm outside temperatures is fine out of direct sunlight. I sometimes keep a 5-gallon bucket with lid on INSIDE my work studio over the winter. I don't smell it at all and it is still working with my studio staying around 65 degrees!
You also want to do this whole process the way I suggest here to keep from bacteria die off which can cause bone discoloration and from gravewax to occur.
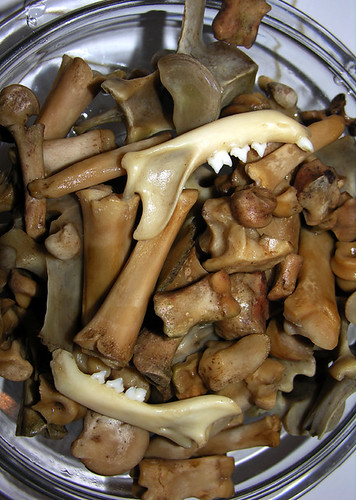
Freshly macerated and rinsed bones, ready to degrease, sanitize and whiten.
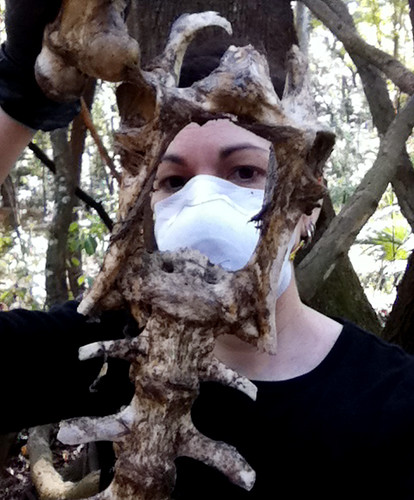
This will be very putrid smelling process as you can imagine rotting flesh is. I advise wearing latex or nitrile gloves when handling these remains until it is sanitized in the final step. I also wear a respirator if it is exceptionally bad.
IN REVIEW - ORDER OF BONE PROCESSING STEPS:
A) DEFLESH - Either nature clean or macerate your remains. I often use a combination of the two. Letting nature do as much as it can for me in my bone cages then I macerate the rest. (Yes, there's more ways to deflesh but I'm just discussing these options here.)

Maceration bucket getting started with mummified fleshy wild boar and deer bones.
B) DEGREASE - Some people like their bones very grease free or only mostly degreased. It varies for me from bone to bone and what they'll be used for. Bones found in the woods or out in a pasture rarely have much grease left in them if at all as the microorganisms living in the soil have already done that for you along with the rain and sun. If you try to degrease them you could end up destroying them. I can tell by the sound, smell, weight and feel of bone how much grease is still in it. You will learn this over time. Many people think any yellow/brown color in bone is grease which is absolutely not true. Often times it is actually soil staining. Especially if it is uniform in color rather than pooling in thicker bone areas as grease does.
C) WHITEN - Do the regular 3% hydrogen peroxide bath until desired color. Some people like their bones brown and stained. But remember if you are going to be handling them and especially if you are going to be selling them as jewelry, in art or for collections you don't want your anyone else getting sick! At least let the bones soak for a couple days. If you see a lot of bubbling when you drop the bones into the bath they are still very soiled or unsanitary.
Speaking of sanitary, I shouldn't have to say this but I've heard of some people mixing their bone processing tools with their kitchen items. No, no, noooo! Do you want to get sick? I always keep my foodstuffs and bone processing tools, containers and such separate. I don't even wash or store them together. Be smart.
And come on people, don't let your pets chew on your bones or drink the maceration water. Seriously. Would you let your children?!?
Lastly, all of these processes take time. You must have patience if you want strong, properly cleaned and sanitized bones. I've found many people just don't have the patience for processing themselves and buy them instead. Or maybe they don't have a strong stomach...haha
I hope this was helpful!
Here is an additional HowTo blog post about maceration - The Mathematics Of Maceration - A HowTo Guide For The Impatient


42 comments:
This is such an informative page. This is a hobby I want to get into and I appreciate not only your thorough yet simple explanations, but also the beautiful way you present yourself and this passion
im so glad i found your blog. bones are beautiful!
thank you for the great details and the pictures you have been a great help
hi.
I am preparing cow femur bones to use as guitar nut blanks. It just needs total degreasing.
I quickly ditched the boiling method. I only use that now for softening the marrow and cleaning it out. My newest batch was lightly boiled, then left out in the backyard to feed the life in the undergrowth. :) I have put my bones in a bucket full of water and dishsoap added. Gotta say that results are already here and I was just wondering if I can continue with this method to completely degrease it?
I don't want it bleached or anything, but bone fat can make catastrophical damage to guitar parts, especially to glued wooden parts. I was wondering if leaving it in a bucket out in the sun (around 40°C for the past month here) can degrease it fully? How do I get the dishsoap out of the bone afterwards? Just by replacing water?
Thanks!
constant mesh - TOTAL degreasing is going to leave you with a weaker porous bone. Bone naturally has grease in it. Read this post to better understand what I'm saying - http://bone-lust.blogspot.com/2013/06/bonelust-q-how-will-i-know-if-skull.html
Ants can be your best friends. A good ant colony can clean bones on smaller animals in 30 days.
I'm sure they are for some people but it sadly is simply not an option for me Allen - http://bone-lust.blogspot.com/2013/09/stick-it-on-ant-pile.html
hello Jana... I recently found a mummified parrot. what's the best way to de-feather it ? and will masceration work for said parrot? if so how do I keep him under water! thanx!
I really hardly ever post anything anywhere in general about birds because of legal issues. Most birds you're going to come across in US/Canada are illegal to have any part of dead or alive because they are Migratory Bird Treaty Act protected species. If you were to macerate most birds you're likely going to end up with nothing but a stinky pile of mush. To process birds, rodents & small reptiles/amphibians you can't really macerate like larger medium sized animals. You literally have to carefully remove the feathers, skin & muscle with surgical tools, tweezers & scissors as best you can. I rarely do this myself because it is so tedious. If it is mummified it may be even harder to accomplish. Or you can soak a while in water & if you're lucky you can carefully peel away the skin from the bones & just hope that most of the muscle was already eaten away by carrion insects. I'll have to make a blog post about this sometime for sure. As well as a longer post about legal issues related to bone collecting.
Jana I am having a hard time finding an email address in order to ask you questions. I am letting my dermestids process a deer skull and a piece if the nasal passage has come off. What is recommended to "glue" it back together? Same thing for any teeth that may fall out.
Hey Tyler!
Just try a little white school glue. Check out this post - http://bone-lust.blogspot.com/2013/06/bonelust-q-how-do-i-put-mandibles-back.html
good luck!
Hey Jana,
I have a horse skull that has been maceration for awhile, and it's pretty clean. Should I let it dry before putting it in the H2O2, or just put it directly in?
Hi Harlee!
I'd say let it dry before putting it in the H2O2 for sure.
Good luck!
jana
Hi Jana
I follow your Instagram, thanks for all the great info. I am sorry to say my cat of 15 years died in the last couple days, and we found her (via vulture) this afternoon. I am considering keeping her bones, and so am wondering if the cage+more vultures, etc is the way to go for cleaning her bones, or if she's too small for this method. Her corpse is mostly still intact, so I really don't want to do it by hand. You seem to not recommend the bury-and-dig-up-later method.... I have something that could work as a bone cage; it's temperate and raining in California right now, so do you have an idea of roughly how long it would take before maceration? Thanks for your help. I could just bury her, but it seems like a waste to not honor her lovely bone structure by adding her to my art collection.
Hi, first off I'm very sorry to hear about your kitty friend. I'm sadly all too familiar with finding one of mine this way myself in the past. Please understand that the bone cage is for mostly maggots to deflesh not vultures. Bone cages are meant to keep scavenger animals from taking off with the limbs and destroying the skull. A proper bone cage will also keep a vulture out. Only something laid on top of the cage a vulture might get (like in the photo i posted to IG). i wouldd never do this with something that was already greatly damaged like roadkill as opossum/raccoon will still be able to climb on top and get to it. OK so an unskinned animal is going to take a lot longer for the flies to get to than a skinned one. I'm going to assume you don't want to skin your friend. There's really no exact about of time for any animal processing step. You're just going to have to check on progress. Could happen in as fast as a week to months to decomp. Also, you can not simply leave her in the cage as in for the whole process. The bones will become brittle before fully nature cleaned (which can take literally years) and would very likely rust if not removed for maceration as soon as defleshed. I do offer pet processing services BTW if this is something you'd like me to take care of for you please contact me at my shop to discuss in a more private forum - https://www.etsy.com/shop/BoneLust - Good luck!
Thank You, Jana. Yes, I will send you a message on Etsy to discuss further. <3
When doing a few small skulls at once is there a bag of some sort I can put each one in so the teeth ect don't get all mixed up? My last batch turned out great but I had teeth from 7 beaver skulls to figure out what teeth went to witch skulls. Thanks
Yardcarps, perhaps try cheesecloth though it may also decay in maceration. Should be OK in peroxide. I just keep skull apart in general to avoid that happening.
Hi Ms. Miller.
I am trying to use Ox bone for handles and instrument bits like nuts.
I read your blog and people's comments because I am new to this Artform. What do you think of using a petro based fuel such as gasoline or kerosene for degreasing? I like your idea that the bone should have some grease in it but I have also read that residual grease combusts the bone over time. Can a synthetic oil be the "replacement grease" for a petro-chem degreased bone?
Regards,
Marcel
Oh and p.s. the handles I am making are for tools that will see clean oil anyways which is why I am considering a petrochemnical for final degreasing. I am currently simmering the bones.
Cheers :)
Marcel Veronesi - The only chemical I use for degreasing in that realm is 100% undiluted acetone. Which is already quite flammable. I really don't want to use anything more flammable personally. Although I have heard of people I know using "white gas" but I have heard that acetone works better in the long run. Also, I would NEVER suggest acetone to beginner bone processor. I'd suggest they stick with dish soap and ammonia and patience. Not that the acetone degreasing doesn't take months as well but it is FAR LESS SAFE.
Hi, Jana!
I find your collection pretty interesting! I would just like to ask something. I am not sure if you are against this but do you think cattle bones (or any bone) can be made into furniture if they are preserved well? After thoroughly cleaning the bones (I read from your other post), what additional measures do you think can make the bones stronger to support weight?
Please ignore this message if it offended you.
Haha thanks ANCG, as a full time bone artist nothing on this topic is strange to me. Very hard to offend me too. I have thought about it myself. I was inspired by the bone couch and chairs in the Texas Chainsaw Massacre movies for sure, and have thought of making one myself. You'd need the bones to be backing in solid wood for this to work probably. Or have very large solid pieces of metal rods running through the bone and involve soldering.
jana,
is there any way to preserve bones after they have been in bleach? would clear reain or paint help?
Thank so much for this site, your tone, the way you write is so terrific and to the point. I had fallen in love with a hunter, and a few days after he had to leave me my dog brought me a severed deer's skull from the woods as a consolation present. Over the past four months the maceration, washing, drying, whitening process has been a very powerful ritual for me to process the breakup. I wouldn't have been able to do it without you!
Wow Sophie, your comment moved me. I'm so glad that I in some way am helping you work through your breakup as yes, it can be very hard. Much love, jana
anita riot, If the bones are actually becoming flaky/brittle from being chlorine bleached you can give them a coat with clear polyurethane spray paint with a matte finish... unless you do prefer it shiny, then use glossy.
Hi, Jana,
Your blog is very informative and interesting. I have a question- I was gifted a necklace with a pendant hand-carved from fishbone. The detail is very small and very intricate and I have noticed some dust has gotten deep in the detail. How do I clean it without damaging it?
PS. I have seen some of your jewelry pictured here and it's beautiful. I'll definitely look at your etsy shop.
Hi Nicole ... I would just suggest brushing it out with an old toothbrush. Thanks, jana
Is there any kind of oil or solution that you can put on dry bones to revitalize them?
Hi. Wonderful page thank you! I was just wondering what you would recomend for a tiny frog? I found it dead between two panes of glass and would like to use it in a charm.
Hi Mrs. Miller… It sounds like it is already naturally mummified and ready to use as-is. I've made plenty of jewelry pieces from frogs just like that myself. You could set it in resin or put it with moss inside a shadowbox type pendant. If you'd like me to make you something with it that is also an option. Check out my custom order listing already in my shop - bonelust.etsy.com - god luck! Jana Miller
Dark Matter Oddities... I would avoid any oils on bone. Look into Paraloid B-72 it is a coating resin. Or a cheap version in watered down white school glue. Or just spray paint it with clear matte spray paint. You'll just have to experiment with what works best with what bone/job. Some sprays/coatings will yellow the bone, some won't. Some will turn it a creamy white even. Some will leave it natural looking. So experiment on bones you don't care about. Good luck! jana
Can you boil the skull and clean it out as good as possible and then reboil to finish on another day?
Hi Ron, Did you read this blog post? You should not boil at all to begin with.
Hi, I'n currently working with bones for a major school art project. Peroxide is a lot more expensive here than in the US I gather, a litre of H202 can be fifty dollars or more, so I was wondering if the peroxide mix is reusable across multiple bones?
Thank you :)
Hi, I don't know where you are located but here in the US hydrogen peroxide is 3% at costs approx $1 for a quart. I'm thinking yours is a MUCH higher percentage or nor pure hydrogen peroxide. I would be very careful touching it with your bare hands and higher percentages need to be diluted or will dissolve bones. Without more info I don't know how to help you. Stay safe!
Do you have any experience with scavengers trying to break into your bone cage? I have a fresh otter
that I found at a site where I work that I want to clean. I know we have black bears out there, so I'm
thinking that a simple wood framed chicken wire type cage might not be substantial enough. My
other thought was to bury it in a bag or cage and let the subterranean decomposers have at it.
Hi Matt - Yes, I absolutely do. I have never used chicken wire because it just isn'y strong enough, easily stretches and easily rusts. You want a much thicker and higher quality wire for you cage like some kind of fencing. I highly advise against burial processing for so many reasons. Take a look at my related bone cage post - BONELUST Q&A: "Can I just leave animals to decompose in a bone cage & do nothing else?" :
http://bone-lust.blogspot.com/2015/03/bonelust-q-can-i-just-leave-animals-to.html
I don't know if it's been mentioned but I wanted to suggest you amend your position on the effectiveness of bubbling Hperoxide. If your Hperoxide is bubbling then it isn't working to damage the bacteria, the bacteria is breaking down the Hperoxide with naturally evolved enzymes into harmless products before it can do damage. Hperoxide is great for this stuff and damages most things (when applied to a blood free non living surface) but a small portion won't be effected and will need to be washed in something else. Keeping in mind though that cold sterilization doesn't really steralize porus materials so even after hitting it with all kinds of chemicals I wouldn't put it near wounds or in my mouth until about 6 months after you're sure there's no tissue or moisture harboring little bacteria.
First Last... I wrote this 4 years ago. It could probably use a little rewrite. But I may never edit it for lack of time. I wrote this blog post "Whitening Bone Using Hydrogen Peroxide NOT Chlorine Bleach" a year later that really covers the H2O2 topic:
http://bone-lust.blogspot.com/2013/06/whitening-bone-teeth-hydrogen-peroxide.html
I will likely write another one at some point with questions I get on this topic.
Best work you have done, this online website is cool with great facts.
pest control san antonio
Post a Comment