Showing posts with label bone collecting. Show all posts

Wednesday, May 24, 2017

Get Help on Facebook: Bone Collecting & Processing Groups

Hello! I apologize for turning off commenting here and never answering some questions. I had way more questions coming in than I will ever have time to fully answer. Plus it is hard to really help you guys here without seeing your photos. So I’m redirecting you to a much better format to help you out - my Facebook groups.

If you did not already know - I’m a full time natural history artist and pet aftercare specialist. Which are my only means of income. My shop is Bonelust.Etsy.Com

I have an overwhelming amount of Pet Memorial Services I’ve taken on. And also find and process most of my own supplies, which is very time consuming.

All while answering countless bone processing, bone ID and art related questions daily at Instagram, Tumblr, Etsy, Flickr & especially Facebook. If you want help with processing or identification I highly suggest you join the related groups below. Even if I am personally too busy to answer your questions one-on-one, there are still a lot of very helpful and experienced members in my groups.

August 2020 Update - My Facebook groups have been around the longest & with the most members, on these topics:

Worldwide members, natural history group: For processing help, identification help, and to show off collections. There is a main focus on bones but it is open to all things natural history. - Skull Collecting

Worldwide members, natural history art group: For artists to share/sell the art, taxidermy & jewelry THEY made from animal by-products and for others to buy. Related drawings, paintings, digital art and photos are also OK. - Bone & Taxidermy, Art & Jewelry


I have more groups but those are the two main groups and from there I can redirect members to more specific groups. Request to join and once I approve you you can start interacting. PLEASE allow me some time to review your FB profile to make sure you are not a bot. I run many groups with over 100K combined members. Sometimes it could take some time before you are added so I appreciate your patience, thanks and see you there!

In the meantime, if you need bone processing help I suggest redirecting to this blog post of mine - 
BONELUST BLOG QUICK LINKS - Answers For Your Bone Processing Questions Are Her 

Saturday, February 20, 2016

BONELUST Q&A: "How can I become your assistant or do an apprenticeship under you?"


I'm always so humbled to get this question. I love that I got so many of you interested in bone collecting, processing and art but everything done at BoneLust is a one woman show and will likely always stay that way. Not that I don't wish I had little packing gnomes helping me get orders out, but because I'm a very private person, I don't have an actual art studio or storefront.

Everything you see here, happens on my property and in my home. I don't honestly have the time to take on an apprentice right now either. I am already teaching my skills daily at my blog & countless social networking locations. If I ever have a workspace NOT at my home this may all change though!

Best I can do is to continue making educational posts here. In case you don't already know, this is where I share my lifetime of bone processing experience. Priceless info, free of charge. So take advantage of it.

As for learning how to do what I do as far as my art goes, I'm completely self taught. Literally a lifetime of experimenting with different art mediums. You're just going to have to dive right in and get your hands dirty. Experiment. Find what mediums YOU enjoy. Do countless hours of research online for supplies and processes. Create, research, experiment, repeat... again and again and again. This is how I do everything I do, daily. Good luck! Jana

Friday, May 15, 2015

BONELUST Q&A: "I've been macerating bones & they are now a strange color! Are they ruined?"

Maceration is the process of purification to remove the remaining flesh from bone. It is the easiest & least expensive way to do this while still leaving bones in good condition. Note that this process is typically best for animals larger than a rat. Smaller bones can turn to mush during maceration as they themselves start to break down.

To macerate you take your animal remains that have very minimal flesh on them (never a whole animal!), add them to a plastic container & fill with plain tap water then replace the tight fitted lid. The lid is important because you don't want insect larvae in your maceration water only the bacteria that will grow and eat away the flesh. You also don't want to leave it out in the rain without a lid or you'll get algae growing. Insect larvae & algae with both start to break down and possibly even stain the bone.

The more flesh on the remains the longer this process will take. Somewhere around 2 weeks the bones should be coated with a film that's pink, red, rust, brown or black. That's normal & means the bacteria is working to remove the flesh. The bacteria may however be dead now though so time to change the water if still fleshy and start the process again, or time to start peroxide bath if done. Pour out only half on the nasty water and add fresh water to fill the rest of the container if the maceration is not done yet.


These deer bones were covered with a bright red film because they were left for too long in the maceration process, on accident. They were completely flesh free though. Thankfully I just hosed the film right off then started the peroxide step to get rid of the awful smell.

The odd colored film you see on your bones is a residue of the bacteria or the bacteria itself coating the bone. It does this when the water runs out of oxygen for the bacteria to survive. Referred to as the bacteria going anaerobic. This anaerobic bacteria in maceration replaces the microbes that were doing the maceration work of defleshing the bones. And therefore the maceration process has come to a halt.

It can be caused by too many microbes using up all of the oxygen in the water or it can be from an oily film on top of the water that keeps oxygen from entering the water. Some ways to prevent this are - larger quantities of water, changing the water or a bubbler. It commonly happens to marine mammal remains during maceration because of the high oil content in their bones rising to the top of the water.


This is a potbelly pig skull that started off lightly mummified that soaked undisturbed for 2 weeks. The maceration water was still fairly clear and yet the skull was turning black. I've found that when there is little flesh to work with or very old flesh this can happen. Sometimes the black film easily hoses off or goes away once the bone dries. In this case though it took a peroxide bath to remove the black coloration. 


Raccoon bone that was pulled out of maceration. It was dropped into peroxide and pulled out an hour later to show how fast the peroxide can get rid of the staining. It can in most cases happen instantly.


"Before" of diamondback rattlesnake bones straight out of maceration.


"After" of same diamondback rattlesnake bones after a peroxide bath.

The maceration water needs to be kept at a certain temp to work. It will not work in the Winter in most locations because it is too cold for the bacteria to survive. It will also die off if it gets too hot in warmer months. For exact temperatures & more extensive info about this see this blogspot blog.

Good luck!

Saturday, March 15, 2014

BONELUST Q&A: "How do I get the bones from this small animal?"

This is one of the smallest skulls in my collection at approx .5" long, from a Carolina Anole. The fact that I have some of these in good condition & complete is quite a task for me.


Give me an entire adult deer & I can process it for the bones no problem. But it is the tiny reptiles, amphibians, rodents, birds & etc that I have the hardest time processing. You can't macerate like you do with medium sized animals (raccoon, opossum, etc) & up (deer, boar, cattle). The bones can literally be eaten up by the bacteria that defleshes larger bones.

You also can't simply let dermestid beetles help with a skeleton this small and forget about it. I tried, and this is all they left me from 8 full lizards. Although I may try that again with a more controlled environment where I watch more closely with fewer beetles.

In the meantime, it comes down to painstakingly slowly & carefully removing the flesh by hand with tweezers & scalpel after rehydrating it with plain water. A very tedious process. Once I myself take the time to master this process I will make a blog about it.

Saturday, September 14, 2013

"Stick it on an ant pile!"

I've heard that countless times in reply to "How do I clean these bones/dead animal?" This anole here is literally the 3rd dead animal in 12 years living at my current location that I've seen with any ants feasting on. And there have been a LOT of dead things for ants to eat on my property over the years. I don't have any piles on my property at all. Too swampy here. So I usually see them out on the well drained and dry dirt road like this.

"Stick it on an ant pile!" I've heard that countless times in reply to "How do I clean these bones/dead animal?" This anole here is literally the 3rd dead animal in 12 years living here that I've seen any ants feasting on.

This is a perfect example of how there are so many deciding factors involved in the steps to process a dead animal. A major one being your location. I simply do not have any of the ant species where I currently am that will help remove the flesh from dead animals. So that option is out for me.

Also, the first and last time I ever tried using ants to help me clean remains over 15 years ago, most of my pet snake was taken underground vertebra by vertebra and rib by rib. I even had it in a cage on top of a screen. So it ruined that whole option for me. I really like having much more control of my bone processing.

I understand though that this may work for other people. I've met people swear by it and that's great. But it isn't something that will work for everyone

Thursday, May 23, 2013

BONELUST Q&A: What do you mean when you say you’re an ethical bone artist?

PLEASE NOTE: I have zero interest in a political debate of any kind. I’m just posting this about my personal beliefs because it is what BoneLust is based on & this is the question I was asked. What a boring world this would be if we were all exactly the same. THANKS!

A bit about me first, Jana Miller. I’ve been collection and processing bones and other things of nature for over 30 years. I’ve been making bone and teeth jewelry since the 1980s. For a long time I only made bone jewelry and art for myself and friends. In 2008, I became unemployed at no fault of my own. So I opened 3 Etsy shops. One of which is, BoneLust/Bone Lust, which offers bone jewelry/art to the public. Each piece is carefully made with love. Nothing is mass produced. I’m the only one working in my shops.

BONELUST BONE PROCESSING PROGRESS: The 5 Wild Boar Skull Project Has To Be Put On Hold For A Bit. So Moved These 4 To This Temp Home. Top 2 Are Almost Done. Bottom 2 Are Drying. 5th Was Just Put In Peroxide Bath.

ABOUT THE BONES & OTHER ANIMAL BY-PRODUCTS USED IN MY PIECES:

I pride myself in NOT SUPPORTING industries that harm/kill animals and/or use their lives as profit. Like trappers, fur garment industries, pet breeders/shops, factory farming/meat industries, or medical research supply companies. "Not support" means I will not purchase any animal by-products from these industries.

I do use bones that hunters have dumped. I live in a very rural/poor area and these hunters feed their families this way and help control invasive species like wild boar. While I myself do not even eat meat (since 1993), beyond seafood about once a month. I’ve also been very active in animal rights, anti-vivisection, conservation efforts, etc. Donating thousands so far in my lifetime to related groups. And have personally rescued easily hundreds of creatures in my lifetime so far. Furry, feathered, insect, spider and otherwise.

99.9% of the bones and teeth used in my jewelry and art I’ve found myself. Then processed myself by the best means to provide you with a strong product that will last, and be sanitary to wear. I consider myself a professional as I’ve been collecting bones for over 30 years now. I do not like waste and honor the lives of these animals in my art/jewelry. I never have nor ever will harm or kill an animal, insect or plant for my bone collection or for the bones used/sold here. Also, all animal remains used in my shop were obtained by legal means approved by the U.S. Fish & Wildlife Service.

Sunday, May 5, 2013

BONELUST BONE PROCESSING Q&A: I want to start collecting bones/animal remains but I'm concerned about disease.

Excited About My New Respirator Filters & Getting My High Quality Gloves Again. Otherwise Even I Couldn't Have Dealt With The Nastiness I Did Today. Didn't Smell A Thing & No Need To Double Up Gloves!

What sort of safety precautions do you take while removing flesh from bone?

Good questions that I think not enough beginning bone collectors think about. Well obviously be super sanitary about each step of it. Here are some steps I take to stay sanitary:

Wear a respirator or at least a surgical/dust mask when you have concerns about airborne disease. I always wear high quality well fitted latex gloves when handling any remains until they are completely sanitary AFTER the hydrogen peroxide bath, which is the final step of processing. You can get every size imaginable in boxes of 100 on Amazon.com. You don't want cheap gloves tearing open while you're handling rotting carcasses. If you only have cheap gloves, double up.

Take care not to do processing where you eat or bathe. Every time I see a photo of a skull in a bathroom sink with their toothbrush and glass nearby I cringe. Keep your processing tools separate from your kitchen tools AND wash separate. Yes, these things would seem like common sense but I've seen bone collectors do things you wouldn't believe. Also, do not let your pets drink maceration water, peroxide bath or chew on dead things. I've seen far too many photos where people think this is funny. It can be VERY bad for your pets to do any of these things. Would you let your child drink/chew on these things???

Also, wash your hands/arms, hair and clothes/shoes after possible contamination. After I've gotten myself into some REALLY nasty stuff I put my clothes (shoes included, I wear Chucks so I can) into the wash and take a shower myself. When you're working on maceration tubs or handling dead animals you can expect a certain amount of contamination of your clothes/shoes. Splashback from maceration baths is very common. If you have long hair like me, take care to pull it back and keep it out of the nastiness. Likewise, wash down your processing work area and maceration tubs after use. The only time I use chlorine bleach in relation to bone processing is when I clean out maceration tubs when they get really bad. Although most of the time I let everything sun sanitize. Because I don't want bleach killing off my maceration bacteria colonies. So if you do use bleach rinse VERY well.

When picking up dead animals to process watch out for gases and liquids escaping the body. Which will almost always happen when you move the body. If you don't have latex gloves with you use a plastic bag to handle it and flip it right into that same bag. Don't lay dead animals in your car without a plastic bag or you'll be sorry. That smell will stay around and leave a very unsanitary stain where it laid. Keep hand sanitizer, gloves, and bags in your car so you're always prepared.

I could go on but that covers the basics and a little extra, just use common sense. Stay safe and sanitary friends.

Saturday, May 4, 2013

Most Important Thing For a Bone Collector? Patience.

One of the main things I see most bone collectors struggling with is having the patience to get the job done right. Right meaning using steps that leave the bone strongest as a finished piece. Processing from start to finish for me can take weeks or even months per skeleton/skull. Start being a dead animal, finished being only the bone/horn/hoof/claw/antlers.

The way I get around being impatient is to always have several projects going on at all times in every step of my bone processing.

1) Natural decomposition and/or maceration.

Deer Remains I Got Oddly Enough, In The Mail

Naturally decomping deer remains, nearly ready for maceration.

BONELUST BONE GIFT: My father brought me 
this great opossum skull. I dropped it right into a maceration tub I 
already had going for an opossum skeleton. When the flesh/fur is this 
dried on it is ok to macerate as is. You'd do more damage to the skull 
tryi
Naturally mummified opossum skull ready to macerate.

BONELUST - Maceration Bucket Refreshing: Deer, Wild Boar & Cattle Bones
Filling up a maceration tub of deer and wild boar bones with water.

Deer Bones Rinsed Beautifully After Maceration Process Of Bone Cleaning: Detailed HowTo Posts At My Bone Collecting Blog Bone-Lust.Blogspot.Com
Flesh free bones after maceration.

Bone Processing Time: Checking On My Maceration & Degreasing Tubs. From Extra Nasty To Almost Clean. Want To Learn More? Check Out My Blog Bone-Lust.Blogspot.Com
Wild boar and deer bones in different stages of maceration and degreasing.

2) Degreasing.

I honestly don't do a lot of degreasing. I've found that a lot of the oils rise to the surface during maceration. On a rare ocassion I do some extra degreasing though with a dishsoap and water soak. Or super weak ammonia and water soak. Both can take months. Also degreasing is really a personal preference of the bone collector. Some people don't care to degrease at all and some like their bones grease free.

3) Hydrogen peroxide (H2O2) bath.

BONELUST BONE PROCESSING PROGRESS: Ran Out Of Containers For Peroxide Baths So 2 Front Wild Boar Skulls Are From The Last 2 Days. You Can See That The 2 In Containers In The Back Are Already Lighter. I Have One Left To Degrease Tomorrow.
Wild boar bones and skulls in different stages of peroxide bath sanitizing and whitening.

Right now I have these skulls/bones in their final H2O2 bath. Deer skulls, goat skull & wild boar vertebrae. One deer skull is on the side to further lighten a stain. The goat skull was too big for the container so once the skull lightened it was time to do the same to the horns (minus the horn sheaths).


BONELUST BONE PROCESSING PROGRESS: Right now I have these skulls/bones in their final H2O2 bath. Deer skulls, goat skull & wild boar vertebrae. One deer skull is on the side to further lighten a stain. The goat skull was too big for the container so once

4) Drying.

BONELUST BONE PROCESSING PROGRESS: Taking advantage of another beautiful sunny day & laid out a huge batch of deer & wild boar bones to dry yesterday. They always look better once the are dried. These were all hunter dumped.
Deer and boar bones sun drying.

BONELUST BONE PROCESSING PROGRESS: First Adult Goat Skull is complete. This will be a keeper for my personal collection.
Finished skull example of a goat.

Want more detailed info on each step? There are extensive blog posts covering each of these steps pictured here. For more info read the rest of my related blog posts.

Maceration Info

Bad Words: BOIL & BLEACH

The Mathematics Of Maceration - A HowTo Guide For The Impatient

BONELUST BONE PROCESSING Q&A: What should the remains look like to begin maceration?

Degreasing Info

BONELUST Q&A: "How will I know if a skull needs degreasing, I'm not sure what it even looks like?"

Whitening Info

Whitening Bone Using Hydrogen Peroxide NOT Chlorine Bleach

Bad Words: BOIL & BLEACH


Sunday, April 28, 2013

BONELUST BONE PROCESSING PROGRESS: First Adult Goat Skull processing progression photos & timeline.

BONELUST BONE PROCESSING PROGRESS: First Adult Goat Skull processing progression photos & timeline.

1) As it started in early March, horn sheaths removed. Added to maceration tub. Some minor flesh and grease present.

BONELUST BONE PROCESSING PROGRESS: See you in a few weeks my beautiful new goat friend. Bath time!

2) Removed from maceration and rinsed, mid April. Had been dumped and refilled once with water.

BONELUST BONE PROCESSING PROGRESS: This goat skull & deer skull/mandible cleaned up nicely after a few weeks in maceration tubs. The deer unfortunately is a bit fragile & coming apart. I think it is because it is a juvenile or struck on the snout by a car

3) Started hydrogen peroxide bath mid April. No grease present or flesh. Only some bone staining.

BONELUST BONE PROCESSING PROGRESS: Right now I have these skulls/bones in their final H2O2 bath. Deer skulls, goat skull & wild boar vertebrae. One deer skull is on the side to further lighten a stain. The goat skull was too big for the container so once

4) Done and horn sheaths replaced late April. Turned out gorgeous.

BONELUST BONE PROCESSING PROGRESS: First Adult Goat Skull is complete. This will be a keeper for my personal collection.

RELATED BLOG POSTS:

Bad Words: BOIL & BLEACH

The Mathematics Of Maceration - A HowTo Guide For The Impatient

Whitening Bone Using Hydrogen Peroxide NOT Chlorine Bleach

Saturday, April 27, 2013

BONELUST BONE ART SHOP Q&A: Who is your animal bone supplier?

BONELUST Q&A: Who is your bone supplier?

I am! This is just a small peek into my bone supplies. 99% of the animal bones, teeth & claws I use in my art I find and process myself. They are natural death, road kill and hunter dumped remains I've collected & fully processed myself.
Nothing is ever killed for my art. On rare occasions I locate ethical sources for anything I can't find locally. Like the quills & deer antler I use, which are naturally shed. Sorry, but I do not sell my bone supplies or tell anyone the sources for any of my supplies in general.

BONELUST BONE PROCESSING Q&A: What should the remains look like to begin maceration?

BONELUST BONE PROCESSING Q&A: What should the remains look like to begin maceration? This photo of opossum remains is a perfect example of when to macerate. Only a little dried on flesh and almost no fur on the bones. I just filled up this container with

This photo of opossum remains is a perfect example of when to macerate. Only a little dried on flesh and almost no fur on the bones. I just filled up this container with water & tightly sealed the lid. Now I will leave the bacteria to do their work for the next 2 to 3 weeks. Do not add anything else, only water. Especially not any soaps or chemicals that would kill the bacteria that need to breed in that water to clean the bones of the flesh. If you put a whole animal in a maceration tub with fur, innards & skin it would take forever. Could potentially cause the bones to start to decay before they fell free. And would be unbelievably horrid smelling. I also stress using a sealed container for the process especially if you are leaving it outside. Otherwise you could grow algae on the bones or have the tub fill will maggots or other creatures that will possibly begin to decay the bone. Lastly, always wear latex gloves during this process while handling the remains/bones. They will be incredibly unsanitary.

For much more info about maceration check out my other posts here:

The Mathematics Of Maceration - A HowTo Guide For The Impatient

Bad Words: BOIL & BLEACH


Saturday, November 17, 2012

A HowTo Guide For My Crock Pot Methods

IMPORTANT EDIT: Too many people are misunderstanding this post and I actually considered deleting it because of the messages I've been getting. This is an absolute LAST RESORT process for LARGE BONES with tough stuck on skin/ligaments only after maceration has already been done. This is NOT for a fast and easy way to clean your remains. You will destroy your bones quickly that way! Especially if they are small/thin. They will crumble in your hands and you will be very sad. I don't want anyone getting mad at me for misunderstanding this post. SO YOU'VE BEEN WARNED! Stick to maceration and be patient. For strong solid bones it take a lot of time, period. I have been processing bones for over 30 years, I know this stuff very well. If you are new at this do not do it.

I've mentioned here previously in my 'Bad Words: BOIL & BLEACH' post that my last resort for removing tough stuck on ligaments, skin and etc from bones is a crock pot. But I didn't really go into much detail. So this is my instructional guide for that.

This crock pot method is one of my own invention. I've never met anyone else that does it. It has worked well for me since the early 90s when I first started using it. I've further mastered it since and figured out other ways to use it for bone processing tasks... and I've used the same trusty crock pot all these years.

DEFLESHING:

When I have a really stuck on flesh mass, ligaments or something similar that maceration has not removed I use the crock pot as a last resort to remove it from the bone. Most of the time it works within hours but in tough cases I've had to leave it overnight or a full 24 hours.

I like to add a metal veggie steamer/strainer to the bottom of the crock pot to minimize the bones/teeth actually touching the hot ceramic pot since it is this extreme heat that can damage them. But if you can find a metal strainer that fits in your crock pot that won't rust, that will work well too.

This method is also a good way to carefully clean smaller more fragile bones that may start to break down during maceration. Put them in a metal screen style tea strainer if they are that small to keep from losing them, or another smaller metal strainer that will fit into the crock pot.

The reason I do this in a crock pot and not stove top is because I like to carefully regulate the temperature. Stove top simmering always seems to eventually boil. The lowest setting on my crock pot never boils. I've discussed why boiling bones is bad in my 'Bad Words: BOIL & BLEACH' post.

I fill the crock pot with water well above the bone and put it on low and replace the lid. Being sure to top off the water as it evaporates. Best part is that there is nothing to do. You just put your bones into the crock pot and go do something else. Just like when you use it to cook dinner.

BONELUST - Virginia Opossum Skull Remains Cleaning

Vultures had literally just pulled the outer skin off this opossum so I decided to do a slow simmer in the crock pot instead of maceration. This worked very quickly with the flesh still so fresh/soft.

There's really not much of a need to add anything to the water. The slow constant heat alone will get the toughest dried on mummified skin off of anything. Often overnight. Sometimes I pour out what has cooked off overnight, add new water and start again... if it is something really fleshy like a mummified head.

BONELUST - I Like Turtles! A Couple New Turtle Skulls. Take 2

These turtle skulls started off whole mummified heads before I added them to the crock pot. The process is so gentle that even the keratin sheaths (or rhamphotheca) that covers the upper and lower turtles jaws were unharmed.

DEGREASING:

If the bones seem very greasy I just add a little dish soap to the water and it helps the natural fats out of the bone and rise to the top. That's the only additive I've ever put in the water with the bones. But grease will still come out of the bone without you even adding soap to the water! This is why I say to add water well above the top of  the bones you've added to the crock pot. The grease will float to the top where you can easily spoon it out of the water.

BONELUST - Partial Coyote Skulls in Crock
Pot

These partial coyote skulls were quite visibly greasy so I put them in the crock pot overnight with some dish soap.

BONELUST - Fat in in Crock Pot

The next morning a good amount of grease was at the top of the water.

BONELUST - Greasy Spoon from Crock Pot

To easily remove the grease from the crock pot so it doesn't get back onto the skulls when removing them I just scooped it out with a spoon. Doesn't get any easier than that. Remember as I discussed previously in my post 'Bad Words: BOIL & BLEACH' that boiling bone will draw the grease further inside the bone. So don't do that to remove the natural fats in animal remains.

SOFTENING BONE TO REMOVE TEETH:

Another thing I use the crock pot for it to soften bone so that it is easier for me to remove teeth. This worked well for these wild boar mandible fragments.

BONELUST - Wild Boar Rotten Jaw Teeth Removal 6

The bone became soft enough after a couple days for me to use pliers and wrenches to carefully smash and break the mandible apart and extract the teeth.

BONELUST - Wild Boar Rotten Jaw Teeth Removal 1

Much more about this at my 'Extracting Teeth From Bone' blog post.

My crock pot method works beautifully. Very low maintenance. Rarely any need to scrub anything from the bones afterwords. I've never even had any need to find another method. I do wish though that crock pots came MUCH LARGER...haha

I hope you enjoy my HowTo blog posts. For most of the time I've been collecting and processing bones the internet was not yet around and this info was not commonly found in books either. So I've had over 30 years of trial and error figuring out these things on my own. I decided to save everyone some time that comes across my blog and let them in on a few of my trade secrets. And hopefully keep some bones from being destroyed in the process.

Wednesday, May 2, 2012

The Mathematics Of Maceration - A HowTo Guide For The Patient


I am constantly being asked how long maceration takes and replying "There is no set equation". So I thought it was time for this blog post for some clarification.

It takes as long as it takes. There are a lot of factors that can change the amount of time from start to finish. Time of year, location, size of remains, amount of remains, type of remains, how much flesh/hide is on remains, etc.

Maceration is my preferred method of cleaning bones of flesh, ligaments, soil, etc. It is one of the most gentle methods to use if you want strong, solid bones as the end result. It is literally a form of rotting or putrefaction. Where bacteria removes proteins from the bone. Simply by putting the carcass remains into a sealed container of water.

But it also takes patience. Lots of it. Here are images to explain.

Opting Out Of Huffing Death

Be safe, be sanitary! I always wear latex gloves when handling the early unsanitary steps of bone processing. Likewise, I prefer to wear a respirator when switching out maceration baths and pulling off tough stuck on skin and hide. That way I can work with it more slowly and carefully rather than rushing it because of the smell.

The Mathematics Of Maceration - A HowTo Guide For The Impatient
(click for larger image)

First Image - Nature/insect cleaned deer and wild boar bones with minimal amount of flesh/ligaments/etc. Added to maceration tub. Was filled to the top with water. Then tight fitted lid was replaced. You don't want any big chunks of flesh or pieces of hide/fur/feathers in your maceration tub. Try to remove as much as you can before you begin this process.

Second Image (top) - 3 weeks later the water in the tub was a rusty brown color. This is a good thing. Means the bacteria are doing their work to remove the fleshy bits. Water was NOT switched out that entire time. Sometimes I prefer to switch out the water now and then as it gets cloudy... say once ever other week. Depends on what I have soaking and time of year. As the oils rise to the top of the water and flesh falls off to the bottom, the water will become incredibly nasty/smelly. As it does, pour it out and replace with new clean water. The rule is that once the water is clear, you're done.

When it is colder it slows down the process. It will work best if kept in a warm location. I've read that maceration works best between 35°C/95°F and 50°C/122°F. I'm located in Florida so I can just leave my big maceration tubs sealed outside year round. The process just really slows down through the Winter.

Third Image (bottom) - There are still some meaty bits on the bone and some of the vertebrae were still attached. So not done yet. Threw them back into the bucket and added water and lid again. Takes as long as it takes. Bone processing takes patience. If you are impatient get several projects going in rotation at once. I usually have all stages of the bone cleaning process going at all time. If you are always messing with the bones or worst, cooking them because you're impatient... you are likely damaging them. True story.

Here's another maceration batch example image:

That Gore Cleaned Up Nicely - That's Actually A Bright Red Bacteria & Not Blood

I left this similar batch of bones soaking for at least a month without switching out the water once. It wasn't planned, I was just busy and forgot. The water had turned this amazing blood red color. The bones rinsed off quite nicely and didn't need to macerate any longer.

They did however smell pretty awful. So I put them into a fresh batch of water with some dish soap to help get rid of the smell and to further degrease the bones. Larger bones like these deer/wild boar pieces take a bit more time to degrease. Some animals also seem to have more grease saturated into their bones.

Next step is to sanitize and whiten. Remember, do NOT use chlorine bleach, only hydrogen peroxide. Check out my blog post Bad Words: BLEACH & BOIL for more bone processing HowTo info about this.

---

PRECAUTIONS ABOUT MACERATION ADDITIVES

Some people do use cleaning agents/detergents in their maceration baths to accelerate softening of the flesh and/or encourage grease to come out of the bones. However, I do not. In my experience adding anything manmade to the mix is only chancing weakening the bones. So the below info is just for informational purposes. I do not endorse any of these products.

Sal soda (sodium carbonate) is a water softener that some people use to accelerate softening of the flesh.

Biz is an enzyme-based bleach. Which makes me hesitant to use it personally. But I've had others tell me it works for them.

Oxiclean is a detergent and bleaching agent. I was told it does NOT work very well. Not only did it not get the fatty residue off of the bones but it also DISSOLVED some entire bones!

Borax (sodium tetraborate) is a laundry booster and will turn your bones to mush. So do not use it!

Vinegar will literally turn your bones rubbery. You don't ever want to use it in any step of processing.

The way maceration works is that living bacteria is in the water removing the flesh from the bone. If you put any sort of additional chemical or soap in the water that would likely kill bacteria rather than promote their growth. That just seems counteractive to me.

If you read through the maceration HowTo guide of one of today's biggest bone companies that specializes in selling high quality bones, you'll see they just use water. Nothing more. That to me says all I need to know. See for yourself, here is The Bone Room.

I'll just close with that thought.

Thursday, March 15, 2012

Bad Words: BOIL & BLEACH

'I continually hear the words 'bleach" and 'boil' come up in topics involving bone processing. Which is exactly where they should never be.

Keep in mind first of all, there is no one way to process animal remains to get the bones. My blog posts here are just my opinion from my own personal experience. I've been collecting bones for 33 years now and I still learn new things all the time. Best way for you to learn is from your own experience.

BONELUST - Death Processing in Pink

There are two standard rules of what NOT to do:

1) NEVER boil bones.


I think the word 'boil' pops up a lot because of one bone process called the European skull boil method. Which is very poorly named. You want your water to simmer, not boil.

Boiling causes fat to soak into the bone. Leaving you with a greasy and yellowish bone. Some grease can be removed with ammonia and certain industrial solvents but they cannot remove deep grease. I absolutely NEVER use any harsh additives, cleaners, solvents in my bone processing. In my experience the more unnatural processes you put the bones through the greater than chances you are lowering the quality of them.

So instead to degrease you want to put your bones in a bath of water and dish soap. Some people swear by Dawn, I've honestly never even used it. I find the generic works just fine. The grease will slowly come out of the bone and float to the top for you to scoop off. This is a slow process which can take weeks or even months.

Boiling can also weaken and break bone that has already started to decay. Turning smaller bones to mush, causing fragile bones like those in the nasal cavity to fall out and often cracking enamel off of teeth. So instead, slow simmer if you must. If you see bubbles, your water is too hot. Though, I personally only use this method as a last resort to remove tough ligaments and hard dried on flesh. I rarely do it on the stove top because I like to carefully regulate the temperature. Though sometime for things such as large skulls I have to.

BONELUST - Black Tusked Wild Boar Skull (Looks Like I Need a Bigger Bone Prepping Pot)
Large wild boar skull doing a quick simmer to clean before peroxide bath.

I normally use a crock pot, which larger bones won't fit in. I fill it with water well above the bone and put it on low. Being sure to top off the water as it evaporates. This crock pot method is one of my own invention. I've never met anyone else that does it. It has worked well for me since the early 90s when I first started using it. When I have a really stuck on flesh mass, ligaments or something similar I use the crock pot as a last resort. Most of the time it works within hours but in tough cases I've had to leave it overnight. Also, another trick I like to use is to add a metal veggie steamer/strainer to the bottom of the crock pot to minimize the bones/teeth actually touching the hot ceramic pot.

BONELUST - Virginia Opossum Skull Remains Cleaning
Vultures had literally just pulled the outer skin off this opossum so I decided to do a slow simmer in the crock pot instead of maceration. This worked very quickly with the flesh still so fresh/soft.

2) NEVER use chlorine bleach on bones.

Chlorine based bleach permanently damages the bone itself. It will start to break down the structure of the bone and will continue to even after it is rinsed and dried. Resulting in chalky, fragile and extremely porous bone that will turn to bone meal with age. Not to mention it turns the bone yellow. Which pretty much defeats the purpose if you are trying to whiten the bone. Once it yellows from bleach there is nothing you can do about it. Believe me, I've tried to salvage yellow bleached skulls before to no avail.

To sanitize and whiten bone use regular household hydrogen peroxide (H2O2) that you can easily and inexpensively get ahold of at the grocery store, dollar store or drugstore. Do a 50/50 bath with water just above the bones in a loose lidded plastic container to reduce evaporation. Oxygen activates the peroxide so you want to let air get to it. But it will evaporate so keep an eye on it and top it off as needed. Also, if you have a tight lid on it pressure may build up and the top literally blows off.

How long? Just keep the bones in this bath until they are the color you want them. This is a personal preference. Note that the bone will dry lighter than it looks wet. This process can take days or weeks. Although if you leave it too long it will eventually make the bone brittle. But this usually would take months for medium sized bones like say of a raccoon. This is a very safe process for most bones if you properly follow my steps. When done whitening, rinse the bones in water then lay out to dry in the sun on towels or dry inside with a fan on. I put towels or paper towels under the bones to help pull moisture out. Be sure the bones are dry before you put them in a sealed container for storage or they may mold.


Important factors: If your H2O2 bath gets really cloudy you likely need to dump it out and start a new bath. Otherwise it will start to macerate instead. Do not use a metal container with H2O2. Use plastic or glass. Store in a cool dark place. Direct sunlight will eventually deactivate H2O2 that's why it comes in dark containers. Do not do this step outside with no lid. You will just end up with deactivated H2O2, algae and insect larvae all over you bones and you'll have to start over... or the bones may be ruined.

DO NOT use hair developer type peroxide on bones, ever. There are additional ingredients in it besides H2O2 and it is MUCH stronger than regular H2O2. Which I think is only 3%. I have experimented with this myself and the developer turned huge deer vertebrae to literally mush in my hands. Likewise, do not use the powdered hair bleach packets. The same results will happen. So you've been warned!

Note that some staining will not come out especially if bones were decaying on the forest floor for some time. Remember, you want to be sure the bones have already been degreased and cleaned of all flesh/dirt/etc before putting into the peroxide.

BONELUST - Old Bone Box Growth/Rot on Misc Animal Bones (Macro)
Too late to clean and whiten these bones. After bones have been left in the elements for some time they begin to break down. These bones are now "living" again covered with algae/fungi that is eating it. This is one reason I choose not to do the bury method. If you wait too long bones have already begun to decay. I like processing methods where I can see what is happening to the remains at all times.

To deflesh bones you have a number of options but I use two processes the most:

A) Nature Cleaning
(some call it Range Cleaning like as in cows dying out in the pasture and left there to decay) - Put the animal remains in a cage and leave outside so that the insects, rain and sun can do their job.

BONELUST - American Carrion Beetle Next to Dead Rabbit
One of many carrion insects - the American Carrion Beetle, Necrophila americana.

You want it in a cage so that scavengers won't run off with limbs. You want to be sure to do this. Believe me, even insects have taken off with my bones in the past. Sometimes I also add a thin screen under the bottom of the bone cage to catch any really small bones that fall off.

BONELUST - Wild Boar Head, Jaw & Tail in Cage
Wild boar head, jaw and tail in cage mounted to tree.

BONELUST - Bucket Full of Deer Remains
Nature cleaned deer remains, ready to macerate.

B) Maceration - Try to remove as much loose fur/flesh as you can by hand. Don't yank it it, that can break the bones! If it is really dry you may be able to cut off parts with scissors. Then put the animal remains in plastic lidded container fully immersing it in water. This is rotting process. Involving the living bacteria that break down the flesh on the bones. As the oils rise to the top of the water and flesh falls off the water will become nasty/smelly. As it does, pour it out and replace with new clean water. Repeat this process until all you are left with is bone. Note, maceration greatly slows in cold/er weather because the bacteria die off.

BONELUST - Bone Cleaning 1
Freshly macerated and rinsed bones, ready to sanitize and whiten.

This will be very putrid smelling process as you can imagine rotting flesh is. I advise wearing laytex gloves when handling these remains until it is sanitized in the final step. I also wear a respirator if it is exceptionally bad.

BONELUST -  Portrait of a Bone Artist

IN REVIEW - ORDER OF BONE PROCESSING STEPS:

A) CLEAN
- Either nature clean or macerate your remains. I often use a combination of the two. Letting nature do as much as it can for me then I macerate the rest. Also, if after I macerate and find I still have stubborn remains not coming off of the bones I use my crock pot method.

BONELUST - Maceration Bucket Refreshing: Deer, Wild Boar & Cattle Bones
Maceration bucket refreshing with wild boar, deer and cattle bones soaking.

B) DEGREASE - This is really a personal preference. Some people like their bones grease free or only partly degreased. Some don't bother with this step at all. It varies for me from bone to bone and what they'll be used for. Bones found in the woods or out in a pasture rarely have much grease left in them. Some people like to leave their bones outside in a sunny spot where the rain and sun will naturally degrease them. I can tell by the sound and weight of a bone much of the time how much grease is still in it. You learn this over time.

C) SANITIZE & WHITEN - Do the 50/50 bath with water and hydrogen peroxide until desired color. Some people like their bones brown and stained. But remember if you are going to be handling them and especially if you are going to be selling them as jewelry, in art or for collections you don't want your anyone getting sick! At least let the bones soak for a day. If you see a lot of bubbling when you drop the bones into the bath they are still very unsanitary.

Speaking of sanitary, I shouldn't have to say this but I've heard of some people mixing their bone processing tools with their kitchen items. No, no, noooo! Do you want to get sick? I always keep my foodstuffs and bone processing tools, containers and such separate. I don't even wash them together. Be smart.

And come on people, don't let your pets chew on your bones or drink the maceration water. Seriously. Would you let your children?!?

Lastly, all of these processes take time. You must have patience if you want strong, properly cleaned and sanitized bones. I've found many people just don't have the patience for processing themselves and buy them instead. Or maybe they don't have a strong stomach...haha


I hope this was helpful!

Here is an additional HowTo blog post about maceration - The Mathematics Of Maceration - A HowTo Guide For The Impatient

Saturday, December 3, 2011

Jana Miller Bone Lust Interview on Postal Treats

A couple years ago I had a nice feature online about my use of bones in my art, jewelry and photography. That domain recently went dead so I'm duplicating it here since it answers a lot of questions I'm frequently asked.

BONELUST - Self Portrait with White-tailed Deer Skull 3 - Ver2 B&W

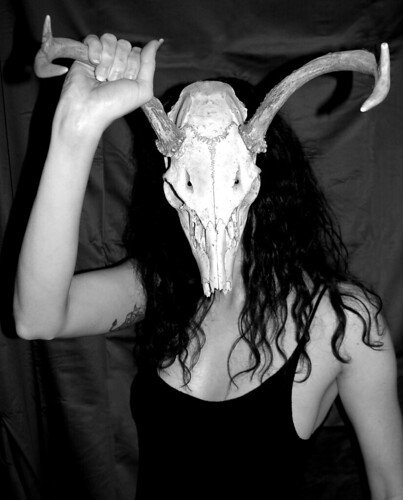
Jana Miller lives in the humid south, where she turns dead things into beautiful pieces of art. Miller combines osteology with metal in a way that is fresh and plain old badass. Unlike the Fox program, she is the real Bones, hunting her personal property for remains to upcycle into something wearable. Her connection with nature is fascinating, so go ahead. Read on.

Tell me, when did you very first start making art?

I honestly don't remember a time not making art. I imagine as soon as I could hold a crayon or paintbrush I was doing it. I even taught art at Summer camps to other children. I've dabbled in so many mediums over the years because I want to try out everything. Ceramics on and off the potters wheel, photography (since I was 7), upcycled mixed media from found items into 3-D pieces, watercolors, india ink, airbrushing, clothing and interior design, jewelry, silkscreen, and just about every possible type of paint, pen, pencil or crayon.

The Hand Sees All - 2

How would you describe the kind of jewelry you make now? And how is it different from taxidermy?

Well taxidermy is the lack of bones. Creating a stuffed version of the animal form from just the outer layer of fur, scales or feathers of that creature. My jewelry often includes those bones that a taxidermist might dispose of. I collect, clean, whiten and sanitize the bones and teeth I use in my jewelry. In self taught processes.

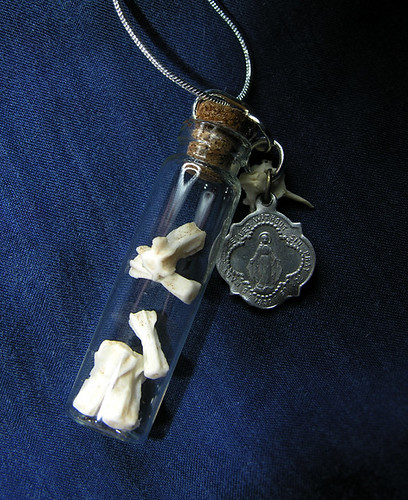
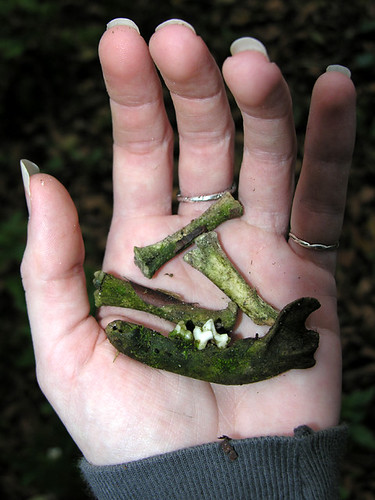
The end result varies. Snake vertebrae elegantly flowing on a vintage silver chain necklace. A number of different animal jaws with teeth mostly in tact paired with vintage charms create pendants. And my little natural history corked glass vials with bones, teeth, porcupine quills, shark teeth and other things from nature in them. What I make depends on what bones I have at the time.

Large Glass Vial  Pendant: Mammal Tail Bones & Vintage Virgin Mary Charm

How did you discover a process for working with bones?

I've been collecting bones, insects and other things from nature since I was seven. My processes for everything involved in collecting and cleaning these things were self taught from trial, error and common sense. As the years go on though I still learn new things and have met quite a few people to discuss these things with to learn from. With the birth of the internet there was a wealth of knowledge to be gained on a topic that is otherwise shunned.

Are there any kind of bones that are impossible to use in your art? Why or why not?

For my art, no. It doesn't have any limits. My found items creations right now are rather small but they don't have to be. In a sense, my entire home is an art piece. The jewelry perhaps may be limited by the size/shape of some bones though.

Is there a big circle of artisans who work with bones, the same way you do?

As the years go on things like this become more accepted by the mainstream, just as say tattoos have become VERY normal now compared to how they were perceived 10 years ago. As that happens the amount of artists grow in size as well. Some have been in the closet in a sense with no one to share their work with while others are just jumping on the bandwagon to make a buck.

I've certainly noticed a boom lately in things normally thought of as weird being given a chance to mingle with the norm. One example would be the new reality tv series "Oddities", which is about a shop in NY that's been on my wish list to visit for a long time now, Obscura Antiques.

There is also a growing fad the last few years of interior decorating with taxidermy, science specimens, natural history items, bones and other related items. Every one of my homes as always looked this way. Often jokingly referred to by friends as "Jana's Museum".

As a lifelong collector and creator of things not accepted by the norm I can tell who has passionately created a piece of art/jewelry and who has a cookie cutter system in hopes of making a quick sale, but not actually getting their hands dirty. Thankfully for the time being this is mostly still a small group of dedicated artists. I'd really rather not see my life's passion become the next fad at Hot Topic.

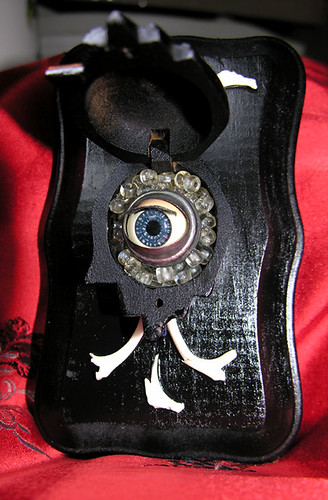
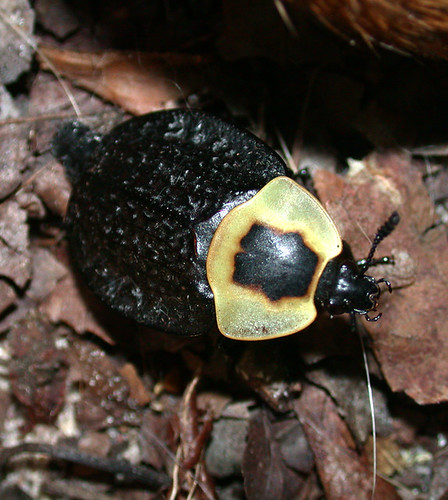
What other materials do you enjoy working with?

Vintage and found items are favorites for sure. Lately the focus of my mixed media art are items found on my property. Things of nature like moss, fungi, bark, insects. leaves, vines, thorns, seed pods and etc. I love working art pieces and ones that move. So I often use shadow boxes and different types of containers that open and close.

Key to Life - White 1 - Open (better shot)


I read on your blog that your love for your work stems from equal admiration of nature and science. What books and blogs can you recommend for people with the same interests?

Well actually, I made my BoneLust blog because there isn't much else out there like it. The topic of death is still heavily shunning in our society, and my work is often closely tied in with that.

I regularly get quite a few questions from people who are interested in starting to collect bones so I figured I'd put my experience out there for everyone to read. I plan on posting more technical HowTo blogs up in the future to answer more specific questions about the processes I use.

There are a lot of related blog/photo links at my blog in the realm of bone collecting/preparing, taxidermy, anatomy, science, art, fashion, movies and music.

A group of Flickr friends of mine that regularly discuss the photos of our finds, collections and art created "The Bone Collectors" message board this past Spring but it is honestly pretty inactive now.

Hoping it picks up again as more people join.

I am on the email list for one blog I can highly suggest - Morbid Anatomy

As for books, I suggest checking out The Morbid Anatomy Library and Cabinet in person if possible.

Or online, The Morbid Anatomy Bookstore on Amazon.com.

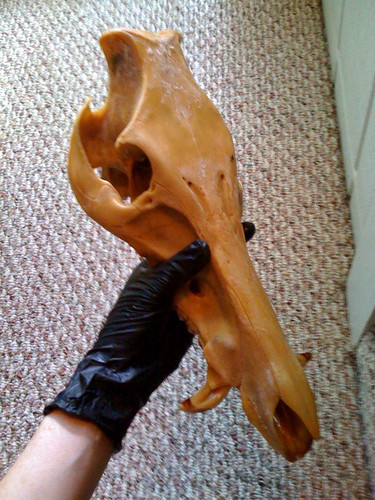
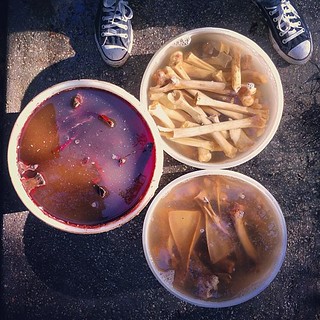
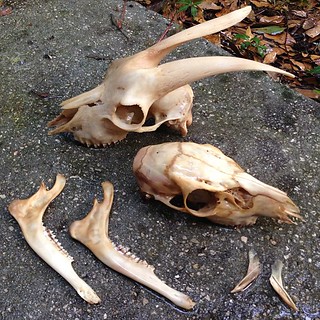
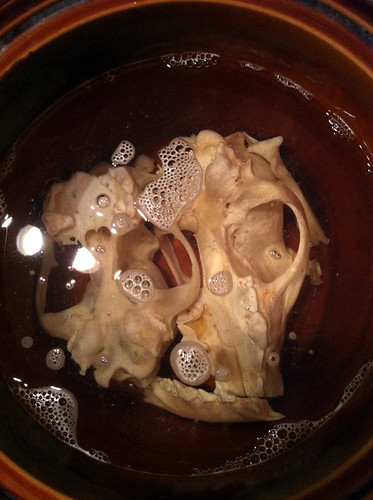
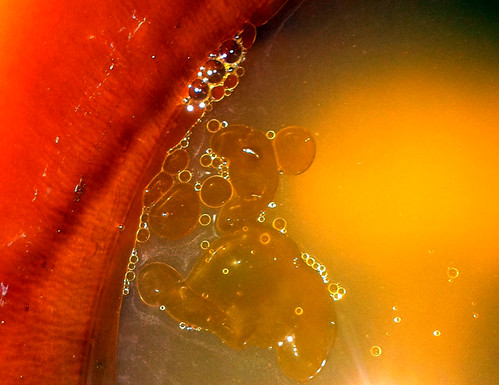
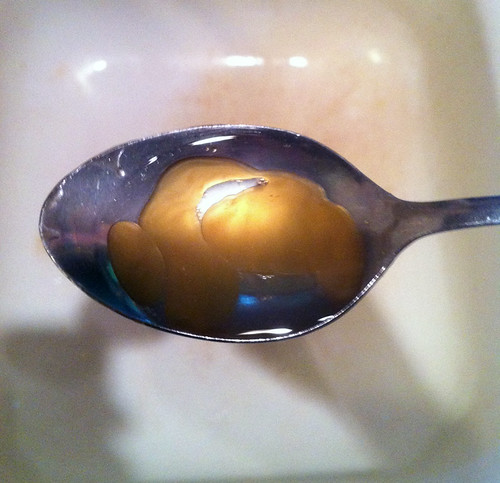
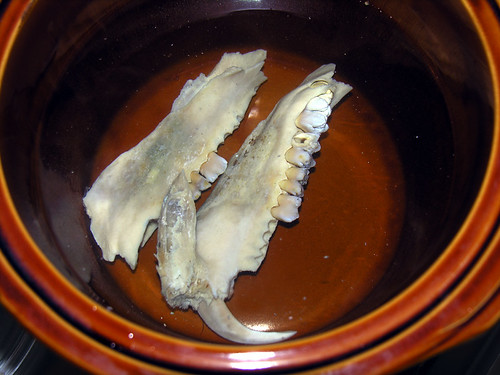
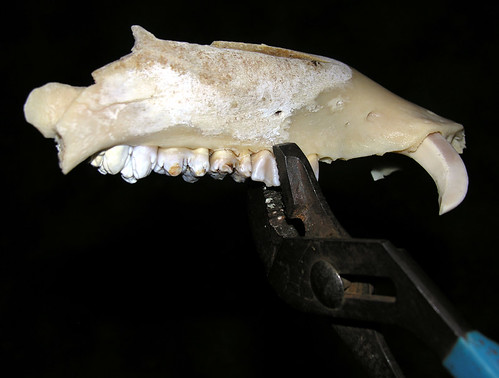
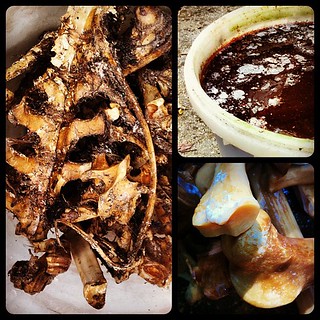
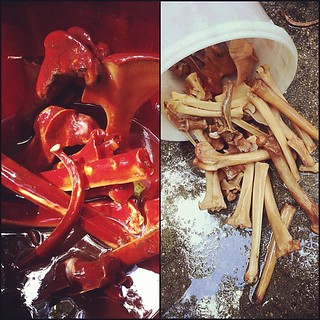
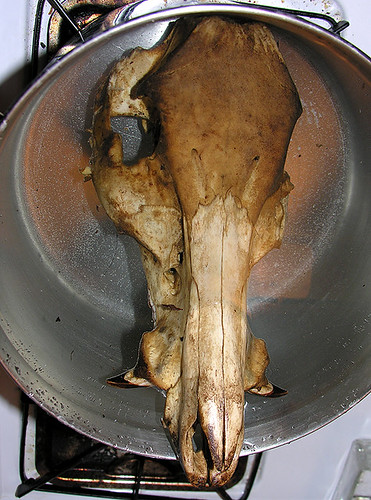
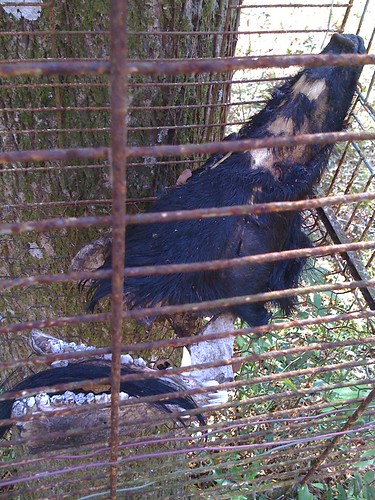
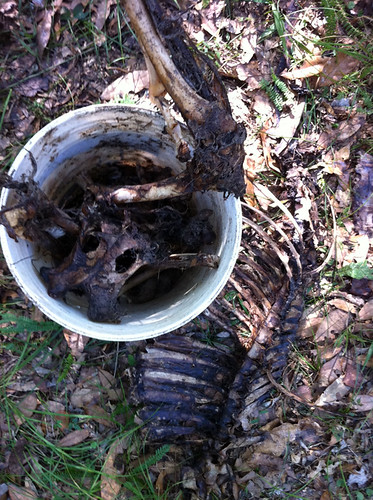
What has been your favorite find so far?

On Christmas day last year I went out for a walk with my two dogs in the woods with the intention of finding some bones. This is what I found:

BONELUST - Christmas Day Found Wild Boar Head & Jaw 1

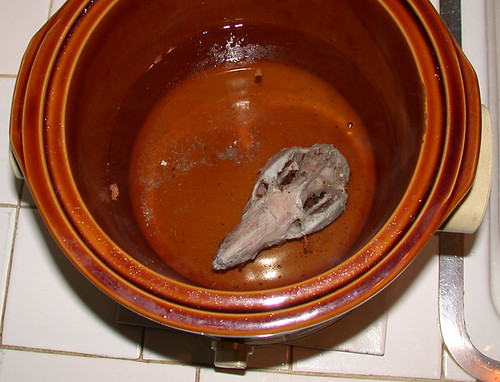
The remains of a huge male wild boar after a hunter took what he wanted. The skull was fully intact and after many months of processing I now have the most beautiful perfect skull in my collection. I don't have a final photo but here it is part way through the cleaning process:

BONELUST - giantwildboarskyllprep1

What albums and bands are you into right now?

Music is right up there with art/photography and bone collecting as far as things go that have always been a part of my life. I have an extremely wide range of music I like and go to shows as often as possible. I also specialize in live music photography.

(Yea, MySpace is dead but that's where I posted my show photoblogs for years.)

Lately I've been listening to the last Zoroaster release "Matador" as well as Karp, Red Sparowes, Tim Barry, Drag the River, Dark Castle, Black Cobra, Torche, Chris Wollard & the Ship Thieves, and the Conor Oberst solo albums and side projects.

----

Related Updates & Interview Followup:

Bone Group - The Bonelust Collective

I wanted to add that since I had this interview I started my own intimate bone group on Facebook that has a focus on animal/human bone processing and collecting, taxidermy and wunderkammer collections. It is for hardcore enthusiasts of these topics. To the degree that I'd consider them more to be lifestyles than hobbies. Not for the squeamish as there are regularly photos of dead animals posted to it. As many of the collector process their own roadkill or hunter dumped remains. Nor is it a group for people that just aimlessly "like" stuff on Facebook and join groups only to sit in the background and watch others. I keep the group active, intimate and organized with a focus on learning. If you think this sounds like something you're up for add me on my Facebook profile and email with your interest to join. I currently have nearly 60 members with many outside the United States.

The Bone Reader

As for music I now work at a music site, The Bone Reader, as Assistant to Editor, Den Mother and Staff Photographer. Yes, I found the name quite fitting too.
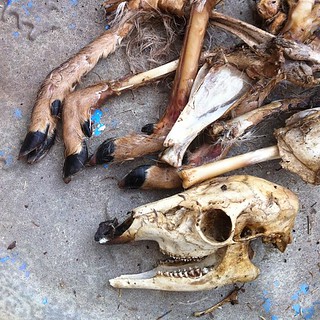
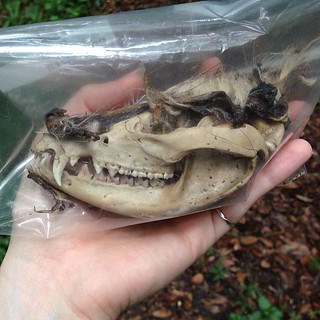
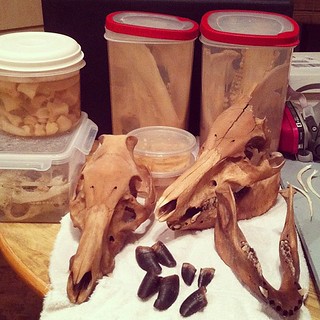
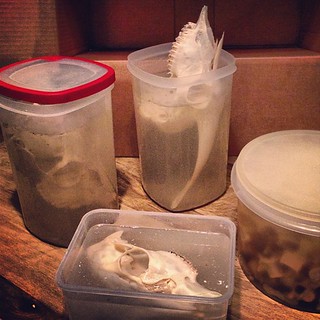
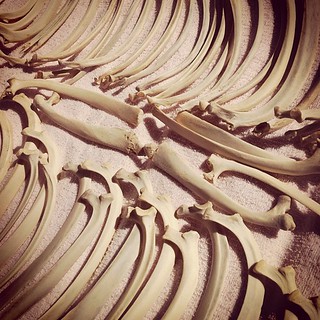
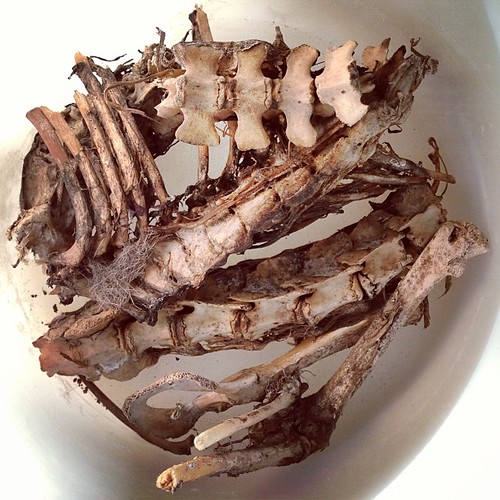
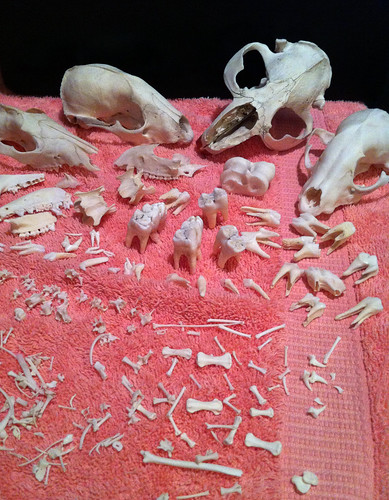
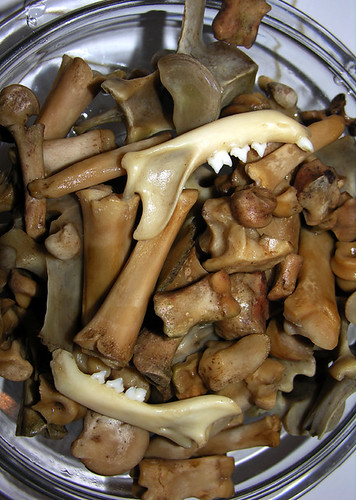
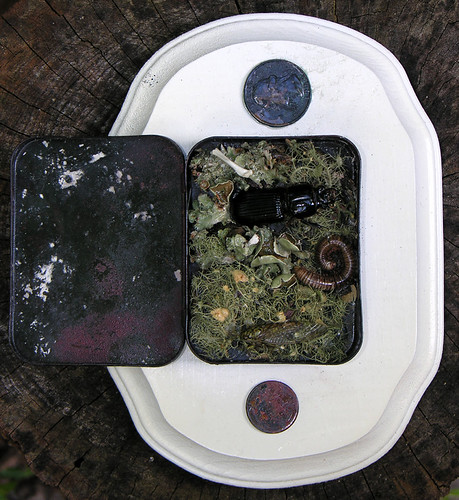